
#StyleMania
Make your own mask!
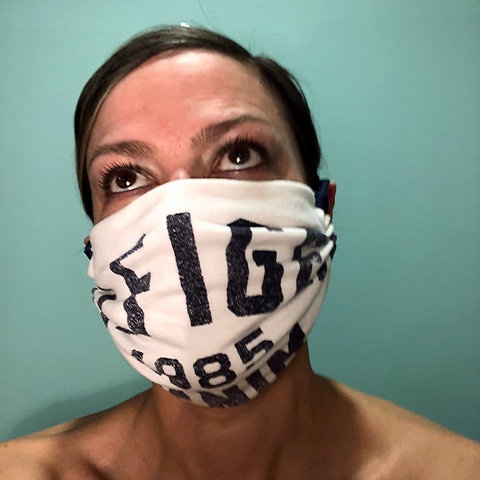
Breathe new life into your t-shirt!
Make a no-sew face mask designed by Femke Magazine

For the sake of our health and the people that we love that it’s imperative we don a mask to venture outside to stand in line, and pick up the various supplies we need to keep us happy during this period of isolation. We’ve also been asked limit our contact with others, so we have to find ways to operate without breathing on people.
Does this mean we have to be boring? No. We can be creative, too! Breathe new life into an old favourite t-shirt by making this fun face mask. We’ve designed a super simple pattern with no sewing that can be completed inside of an hour, following these simple steps.
Here is what you will need:
• a cotton t-shirt
• fabric scissors
• a few straight pins
• 2 pieces of yarn, ribbon, or fabric 24" long for ties 
1. Download and print the pattern below at 100% size on an 8 1/2" x 11" sheet of paper. This pattern measures 8 1/2" across. Cut off the access as indicated on the pattern.
2. Pin the pattern to your t-shirt using the centre line as a guide. Make sure to catch both the front and back of the t-shirt. This pattern needs two panels.
3. Cut out the pattern around the outside. Keep the t-shirt scraps for ties.
4. Note that you have cut out two pieces. This mask has two layers.
5. Fold the fabric on the black circle dots and using the scissors, snip a tiny hole across each one, along both sides of the mask. You’ll thread your ties through these. Watch your fingers!
6. Remove the pattern, but keep the two t-shirt panels pinned together to keep your holes for your ties aligned.
7. You are ready to string your ties, starting from the top of the mask. When you choose ties, be mindful of washing, and choose something that is colour-safe.
8. Note how the ties are threaded in our sample.
9. Note that the mask is open at the bottom. If you were interested in putting additional vapour resistant barrier inside, insert it here. For information on what fabrics are best used for this purpose, read this.
10. We recommend taping your ties to a large needle, or nail, to help feed the ties through the holes. It’s not necessary.
11. Starting at the top of the mask, form the hem that will go across the bridge of your nose. Thread the tie through, and feed the ties downwards, all the way to the bottom, following our sample.
12. Do this on both sides. When done, we are going to make the knots that will hold the ties in place. One on each side.
13. Note how the knot is tied in our sample. Tying a knot here holds the hem down, and it looks nice.
14. Flip the mask over. Find the first loop. We are going to use it to tie off the knot from the front of the mask.
15. Take your tie and fold it around the back, over the seam and through the loop. Pull the knot tight slowly, positioning it to secure the hem at the bridge of the nose closed. If you were going to add the (optional) wire across the nose, do it now. We suggest using a needle and thread to do that, despite this being a no-sew pattern.
16. Once the knots are tied, you’re done! Bunch up the sides following the pattern, and try it on! Tie it behind your head, over your ears, and at bottom behind your neck. Adjust to fit, and off you go. Snappy and safe. This is a great pattern that can be easily adapted to fit bigger heads and faces, and the mask covers beards really well. Download it.
Be creative! We’d love to see your results! Send us your pics. And stay safe.

Love, Femke xo


0 comments